Here's a very useful tip to create bootable CD for Windows XP Using Nero.
--== Things that you need ==--
1. A Windows XP CD/DVD (Bootable or Non-Bootable)
2. CD/DVD Burner
3. Nero Burning Rom.
--== Process ==--
0) Copy all your WINDOWS XP CD files to a Folder
1. First step is to download this File >> Boot
2) Extract this file into C:\
3) Start Nero Burning ROM
4) Select File >> New from the menu
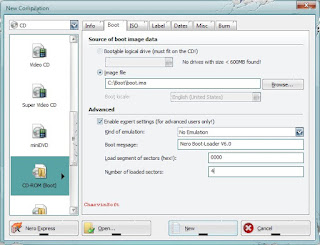
5) Select CD-ROM (Boot)
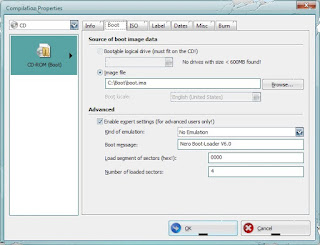
6) Select Image file from Source of boot image data. (C:\Boot).
*) Press the Browse button
7) Check Enable expert settings (for advanced users only!).
8) Set Kind of emulation: to No Emulation.
9) Set Load segment of sectors (hex!): 0000.
10) Set Number of loaded sectors: 4.
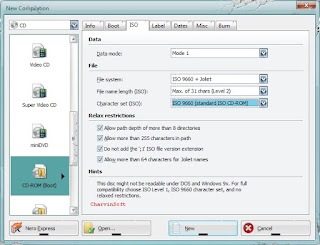
11) Click on the ISO tab.
12) Set Data mode: Mode 1
13) Set File system to ISO 9660 + Juliet
14) Set File name length (ISO) : Max. of 31 chars (ISO Level 2).
15) Set Character Set (ISO) : ISO 9660 (standard ISO CD-ROM)
16) Check all Relax ISO Restrictions.
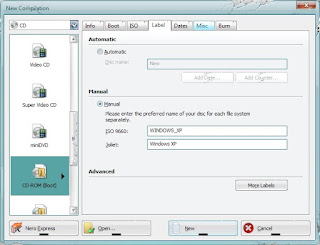
17) Click on the Label tab
18) Click on Manual button
19) Enter any Label Name!
20) Click on More Labels
21) Enter the detail below inside the ISO 9660 and Joliet section.
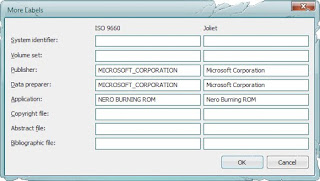
22) Click the Ok button
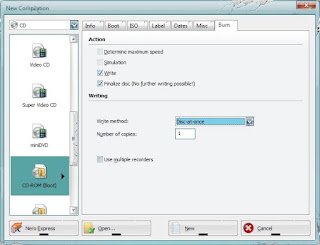
23) Click the Burn tab.
24) Check Write.
25) Check Finalize CD (No further writing possible!).
26) Set Write Method to Disc-at-once.
27) Click the New button.
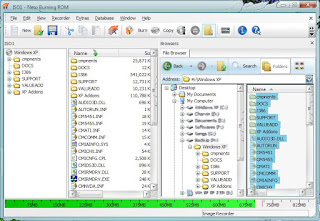
28) Locate the folder containing all the Windows XP file
29) Select everything in the folder and drag it to the ISO compilation panel.
Note: Some files are not show in the following image.
30) Click the Burns the current compilation button.
31) Click the Boot tab.
32) Verify the settings. Correct if needed.
33) Click the OK button.
34) Click the Burn button
35) Wait for the disk to finish
36) Click Ok
37) Click Done!
And Your WINDOWS XP is Bootable Now!!

--== Things that you need ==--
1. A Windows XP CD/DVD (Bootable or Non-Bootable)
2. CD/DVD Burner
3. Nero Burning Rom.
--== Process ==--
0) Copy all your WINDOWS XP CD files to a Folder
1. First step is to download this File >> Boot
2) Extract this file into C:\
3) Start Nero Burning ROM
4) Select File >> New from the menu
5) Select CD-ROM (Boot)
6) Select Image file from Source of boot image data. (C:\Boot).
*) Press the Browse button
7) Check Enable expert settings (for advanced users only!).
8) Set Kind of emulation: to No Emulation.
9) Set Load segment of sectors (hex!): 0000.
10) Set Number of loaded sectors: 4.

11) Click on the ISO tab.
12) Set Data mode: Mode 1
13) Set File system to ISO 9660 + Juliet
14) Set File name length (ISO) : Max. of 31 chars (ISO Level 2).
15) Set Character Set (ISO) : ISO 9660 (standard ISO CD-ROM)
16) Check all Relax ISO Restrictions.

17) Click on the Label tab
18) Click on Manual button
19) Enter any Label Name!
20) Click on More Labels

21) Enter the detail below inside the ISO 9660 and Joliet section.

22) Click the Ok button
23) Click the Burn tab.
24) Check Write.
25) Check Finalize CD (No further writing possible!).
26) Set Write Method to Disc-at-once.
27) Click the New button.

28) Locate the folder containing all the Windows XP file
29) Select everything in the folder and drag it to the ISO compilation panel.
Note: Some files are not show in the following image.
30) Click the Burns the current compilation button.

31) Click the Boot tab.
32) Verify the settings. Correct if needed.
33) Click the OK button.

34) Click the Burn button
35) Wait for the disk to finish
36) Click Ok
37) Click Done!
And Your WINDOWS XP is Bootable Now!!

Comments
Post a Comment
I couldn't give up now.